Easter is the perfect time for sweet treats and creative packaging!
Whether you’re making gifts for little ones, party favors, or just adding a handmade touch to your Easter celebrations, this DIY Easter Treat Box is a must-try project.
Using Stampin’ Up!’s Book Treat Boxes, some gorgeous Storybook Moments Designer Series Paper, and adorable elements from the Storybook Friends and Darling Dinos bundles, you can craft a delightful keepsake that’s as fun to make as it is to give.
Let’s hop right in!

Creating the Base:
We’ll start with the versatile Stampin’ Up! Book Treat Boxes. These boxes are perfect for holding small gifts, candies, or even a heartfelt note. Their sturdy construction provides a fantastic foundation for our Easter masterpiece. Before assembling the box, measure and cut Storybook Moments Designer Series Paper to cover the outside panels. The soft, whimsical designs in this paper pack add the perfect storybook charm to your project. Secure the paper with adhesive tape or liquid glue for a seamless finish.
Adding a Touch of Whimsy:
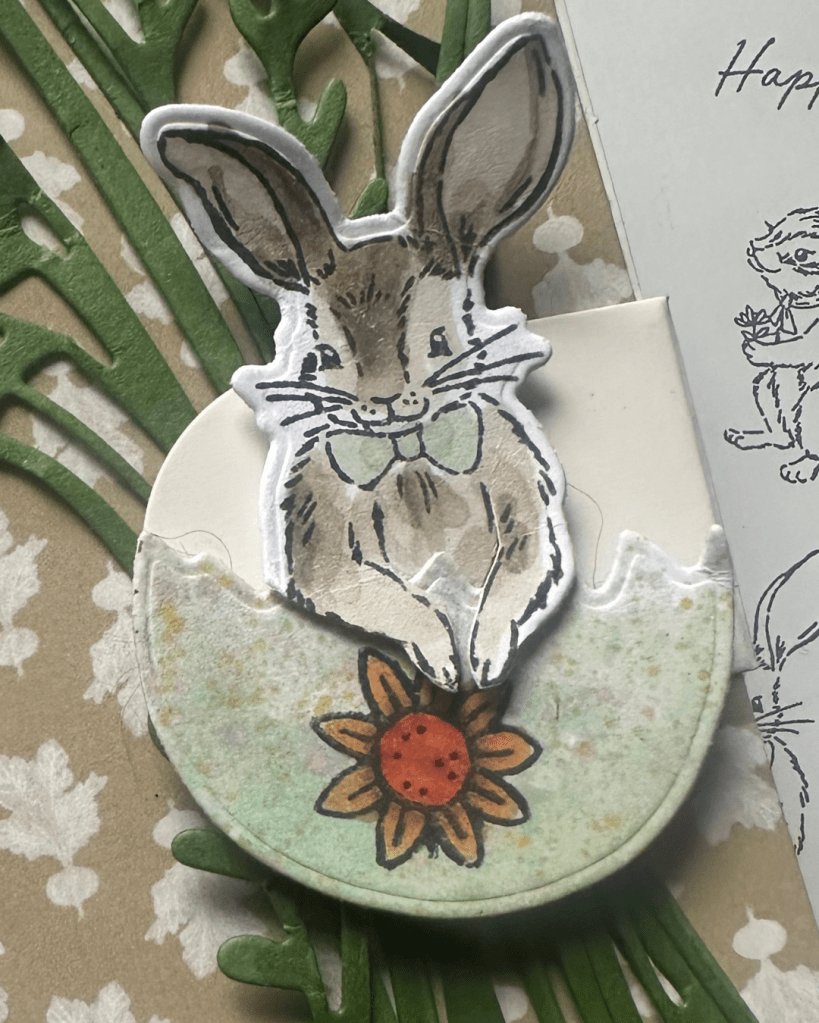
Now for the centrepiece! We’ll create an adorable bunny nestled inside an Easter egg.
- Stamping the Bunny: Use the Storybook Friends Photopolymer Stamp Set to stamp a cute bunny image onto cardstock.
- Die-Cutting the Egg: Use the Darling Dinos Dies to die-cut an egg shape. This die set isn’t just for dinosaurs; it’s perfect for creating unique egg shapes!
- Adding Floral Details: To transform the egg into a charming Easter egg, stamp a small flower from the Darling Dinos Stamp Set onto the egg’s surface. This adds a delightful touch of spring.
- Assembling the Scene: Carefully adhere the stamped bunny inside the die-cut egg and then attach the entire piece to the front of the treat box.
Finishing Touches:
Feel free to add other embellishments like ribbons, bows, or additional stamped images to personalize your treat box. Consider adding some small candies, chocolate eggs, or a handwritten note inside. These boxes make adorable place settings for Easter brunch, thoughtful teacher gifts, or fun surprises for kids.
Tips and Tricks:
- Use coordinating colours from the Storybook Moments Designer Series Paper for your stamping and embellishments.
- Experiment with different layouts and designs to create a unique treat box.
- Don’t be afraid to mix and match stamp sets and dies to achieve the desired look.
Final Thoughts
Handmade projects like this Easter Treat Box add so much joy to the holiday season and with the versatility of Stampin’ Up! products, the possibilities are endless. This handcrafted treat box is perfect for gifting to family, friends, or anyone who deserves a little Easter cheer. Happy crafting, and Happy Easter!
Are you making Easter crafts this year? Let me know in the comments – I’d love to see your creations!
Watch it Come together
What We’re Loving


Stay tuned for more inspiring projects using Stampin’ Up!’s incredible products.
Til next time, see you soon & keep creating!
Maz

What do you think?